Over the last few months, we have worked very hard to make the RGCMS a much better and more feature rich product. In effect it means that most of the screen shots you will see throughout this blog will be a bit outdated. The basics remain the same though, so it shouldn't be too hard to figure out what's going on.
There are still a few changes we want to make to the RGCMS though, and as soon as we're ready to launch the latest version, we'll start redoing the various tutorials already on this blog, and add many more.
Thanks for everones support of the last few years!
Friday, February 18, 2011
Tuesday, November 30, 2010
How to create a "hidden" page
If you would like a page you have created in the RGCMS to NOT display in the menu, it is very simple to do.
Now, depending on your website's menu structure, there is two ways to do this. When editing a page, close to the top you will see a field called "In men:" - this is what we need to use to make a page not appear in the menu.
Next to "In menu" you will either see a tickbox (or checkbox if you will), or a drop down box - If you see the checkbox/tickbox, simply UNTICK it by clicking on it (so that the checkbox is empty, no tickmark inside it) - otherwise, if there is a drop down box with a few options, simply select the top option "None".
Save the page, and from now on, this page will not appear in your website's menu structure anymore, but can still be linked to and viewed.
As always, remember to save!
Friday, May 14, 2010
How to ebmed a piece of code
If you want to, for example, add a youtube movie clip to a page, or basically paste any piece of embedding code that a website gives you, just follow these few easy steps.
Firstly, the WYSIWYG editor does not allow you to paste the embedding code into it. If you try to "trick" it by adding it to the Source View section, it will appear to work, but the next time you want to edit the page, it probably won't work at all.
For this I have created a section what I call Page Extras - this allows you to add any number of extras to your page, and come in 3 categories: WYSIWYG extra, which is just a WYSIWYG editor like the normal one, HTML extra, allowing you to paste raw HTML coding onto the page, and Form extra, allowing you to link a form you've built with the Form Builder.
So, to add that raw HTML code (like the embedding code given to you by YouTube, or Google Calendar for example), first go the list of pages. In the Actions column, you will find the various available actions. The second to last action is Page Extras, with the icon
Go ahead and click on it, and you will see a screen that looks like the following (if you don't have any page extras loaded for the page):
 It gives you the option to add either a WYSIWYG extra, HTML extra or Form page extra.
Click on the second icon:
This will allow you to paste the code given to you by YouTube or whichever site you used, and voila, you've just added raw HTML coding to your page.
Firstly, the WYSIWYG editor does not allow you to paste the embedding code into it. If you try to "trick" it by adding it to the Source View section, it will appear to work, but the next time you want to edit the page, it probably won't work at all.
For this I have created a section what I call Page Extras - this allows you to add any number of extras to your page, and come in 3 categories: WYSIWYG extra, which is just a WYSIWYG editor like the normal one, HTML extra, allowing you to paste raw HTML coding onto the page, and Form extra, allowing you to link a form you've built with the Form Builder.
So, to add that raw HTML code (like the embedding code given to you by YouTube, or Google Calendar for example), first go the list of pages. In the Actions column, you will find the various available actions. The second to last action is Page Extras, with the icon
Go ahead and click on it, and you will see a screen that looks like the following (if you don't have any page extras loaded for the page):
Click on the second icon:
This will allow you to paste the code given to you by YouTube or whichever site you used, and voila, you've just added raw HTML coding to your page.
Tuesday, January 26, 2010
How to use tables to add captions to images in the WYSIWYG editor
If you used the WYSIWYG editor of the CMS to add an image, and want to give that image a caption (some text about the image), it can be a pain to get the text nicely aligned with the image. And using a bunch of spaces is NOT a good idea!
Anyway, here is a quick tutorial on how to do it nicely, by using tables. In this example, we're going to add two pictures next to each other, with their captions below each image in the center.
So, to achieve this, we must first draw a table that will contain the actual pictures, as well as the captions. Since we want our captions to align up nicely next to each other, we're going to have them in their own ROW. So, the images will have a row, and the captions will have a row. Also, each image and caption will have their own CELL - in HTML we may refer to the Cell as the TD or Table Data...
Anyway, lets get our table in first by clicking the Insert/Edit Table button:

This will bring up the Table Properties screen:

It might be intimidating at first, but if you look closely, you'll see that is not! Anyway, for this table we want 2 rows and 2 columns. Also, I'm gonna leave the border size on 1, but feel free to make the value 0 if you don't want your table to display its border. Next, I'm making the width 100 PERCENT (not pixels), and the rest I'm leaving as is. The end result for this screen will look like this:

Go ahead and click the OK button at the bottom, which will draw the table in your body copy:

Now, add the images in the first row, and lets center them as well (see here: http://rgcms.blogspot.com/2009/02/adding-image.html if you don't know how to add images yet...):

Next, simply click in the cells underneath each image, then type in the caption you want, and remember to center the text as well:

That is how easy it is! As always, remember to save the page. Till next time!
Anyway, here is a quick tutorial on how to do it nicely, by using tables. In this example, we're going to add two pictures next to each other, with their captions below each image in the center.
So, to achieve this, we must first draw a table that will contain the actual pictures, as well as the captions. Since we want our captions to align up nicely next to each other, we're going to have them in their own ROW. So, the images will have a row, and the captions will have a row. Also, each image and caption will have their own CELL - in HTML we may refer to the Cell as the TD or Table Data...
Anyway, lets get our table in first by clicking the Insert/Edit Table button:


Now, add the images in the first row, and lets center them as well (see here: http://rgcms.blogspot.com/2009/02/adding-image.html if you don't know how to add images yet...):


That is how easy it is! As always, remember to save the page. Till next time!
Sunday, January 17, 2010
Creating a Nav link that links to a custom url (like your blog)
If you would like to create a link in your navigation menu that links to an external website, like your blog for example, just follow these simple steps:
Firstly, create a new page as you would normally do, which will bring you to this screen:

Right at the top of the fields, you will see one labeled "Links to url", with a checkbox next to it:

Go ahead and tick this checkbox, which will change the screen to look like this:

As you can see, it now asks for you to Type in the URL, select the parent page (though this is not applicable to all CMS's...), specify whether it is in the menu or not, and Page Name. So, go ahead and type in the FULL url into the "Type in URL" field (be sure to include the http:// part as well - easiest way to ensure you do this right, is to copy and paste the address in the browser open on the website you want to link to...), and remember to give it a Name, otherwise it will not show in the menu.
Next, click on Save, and voila! You now have a navigation link linking to an outside URL.
Firstly, create a new page as you would normally do, which will bring you to this screen:

Right at the top of the fields, you will see one labeled "Links to url", with a checkbox next to it:

Go ahead and tick this checkbox, which will change the screen to look like this:

Next, click on Save, and voila! You now have a navigation link linking to an outside URL.
Sunday, January 10, 2010
Making a link to another page in your cms
Here is how to make a link to one of your CMS pages:
It works almost exactly like normal links. Firstly, select the text you want to make the link, and click the Insert/Edit Link button:

This will open up the Link Dialog box:
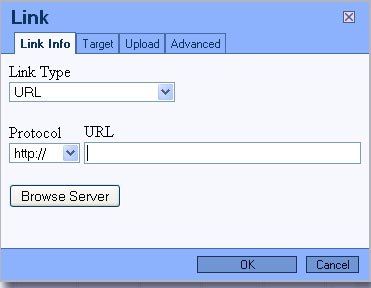
Here, we want to change the "Protocol" option to

Next, open up your website in a new window or tab, and go to the page you would like to link to. Once the page is open in front of you, select the part in the address bar after your websites url (url would be something like http://www.rgtwebhosting.com/ or http://www.rgcms.co.za/).
You want to select the part AFTER that. Say for example the address is http://www.rgtwebhosting.com/HostingPackages.html , then you ONLY want to select the "HostingPackages.html" part (in other words, the part AFTER the last forward slash "/"), and copy that by pressing Ctrl+C on your keyboard:

Once that is copied, paste it (Ctrl+V) into the Link Dialog, in the URL text box:

Now click the Ok button, and you've just created a link to one of your CMS pages. Once again, remember to save the page once you're done editing the page!
UPDATE
We've been battling for months and months for our WYSIWYG editor creators to make a more detailed help section on how to customize it - well, we've finally got it right to include a new option in the drop down box mentioned above - in the latest version of the RGCMS (contact your web designer about getting the upgraded version), you can now select a "RGCMS Page" option from the Link Type list, and then you'll see a list of all the pages in the CMS, and you can simply select which one you would like to link to.
It works almost exactly like normal links. Firstly, select the text you want to make the link, and click the Insert/Edit Link button:


Here, we want to change the "Protocol" option to

Next, open up your website in a new window or tab, and go to the page you would like to link to. Once the page is open in front of you, select the part in the address bar after your websites url (url would be something like http://www.rgtwebhosting.com/ or http://www.rgcms.co.za/).
You want to select the part AFTER that. Say for example the address is http://www.rgtwebhosting.com/HostingPackages.html , then you ONLY want to select the "HostingPackages.html" part (in other words, the part AFTER the last forward slash "/"), and copy that by pressing Ctrl+C on your keyboard:

Once that is copied, paste it (Ctrl+V) into the Link Dialog, in the URL text box:

Now click the Ok button, and you've just created a link to one of your CMS pages. Once again, remember to save the page once you're done editing the page!
UPDATE
We've been battling for months and months for our WYSIWYG editor creators to make a more detailed help section on how to customize it - well, we've finally got it right to include a new option in the drop down box mentioned above - in the latest version of the RGCMS (contact your web designer about getting the upgraded version), you can now select a "RGCMS Page" option from the Link Type list, and then you'll see a list of all the pages in the CMS, and you can simply select which one you would like to link to.
Monday, December 7, 2009
How to use the Form Builder
I am very excited to announce that I have created a very nice form builder module for the RGCMS, as well as the RGCMS Lite. I have been playing around with the whole idea for more than a year, and about a month ago, I just decided that now is the time!
Anyway, here is how to create a form for your website.
When logged in to the RGCMS, you will see a new option in the menu called "Forms". If you hover on it, you will see 2 options namely View Forms, and Add a new Form.
Lets go ahead and click Add a new Form, which will open up the add new form screen:

Here you can fill in all the relevant details for the form. The most important of these are the Name, To, Subject Line, and Gmail username and password.
The name of the form is just so that you know what form it is, for example: "Contact Form". The "To" field, is the email address where the form will be sent when filled in. The "Subject Line" is what will appear in the subject line. You must specify a Gmail username and password - if you do not have one, I highly recommend getting one (its free!). The form is sent through the Gmail mail server, which also means you have a online backup of all the forms that get submitted through your website, in the sent items part when logged into your gmail account.
(I personally recommend creating a new gmail account specifically for your forms though...)
Anyway, after filling in the details, just click the Add Form button, and VOILA, the form has been created, and is now ready for some fields - to do that, click on the fields button in the row of the form:


Click on the button, and you can now enter the details for the new field, which will look like this:

As you can see, the Field Type is set to Text Box by default, and you can now enter all the properties for the field.
Now, all of the fields have the Name, Description and Title properties, but, depending on the field type, some of them have different properties that needs to get filled in.
There are basically 8 different fields you can select: Text Box, Email Text Box, Drop Down Box, Country Drop Down Box, Date Selector Drop Down Box, Text Area, Radio Button Group and Checkbox.
Just follow the onscreen instructions, fill in the relevant details, then click the Add Field button at the bottom to add the field. In this way, you can add as many fields as you want to your form.
After a few fields, you will have a screen similar to this one:


To add the form to one of your pages, just click on the View Extras for this Page button:

which will bring you to this screen:

As you can see, there are three options here, but we want to click on the third option to add the Form to the page:

This will show you this screen:

Anyway, here is how to create a form for your website.
When logged in to the RGCMS, you will see a new option in the menu called "Forms". If you hover on it, you will see 2 options namely View Forms, and Add a new Form.
Lets go ahead and click Add a new Form, which will open up the add new form screen:

The name of the form is just so that you know what form it is, for example: "Contact Form". The "To" field, is the email address where the form will be sent when filled in. The "Subject Line" is what will appear in the subject line. You must specify a Gmail username and password - if you do not have one, I highly recommend getting one (its free!). The form is sent through the Gmail mail server, which also means you have a online backup of all the forms that get submitted through your website, in the sent items part when logged into your gmail account.
(I personally recommend creating a new gmail account specifically for your forms though...)
Anyway, after filling in the details, just click the Add Form button, and VOILA, the form has been created, and is now ready for some fields - to do that, click on the fields button in the row of the form:

Which will bring you here:


Now, all of the fields have the Name, Description and Title properties, but, depending on the field type, some of them have different properties that needs to get filled in.
There are basically 8 different fields you can select: Text Box, Email Text Box, Drop Down Box, Country Drop Down Box, Date Selector Drop Down Box, Text Area, Radio Button Group and Checkbox.
Just follow the onscreen instructions, fill in the relevant details, then click the Add Field button at the bottom to add the field. In this way, you can add as many fields as you want to your form.
After a few fields, you will have a screen similar to this one:

Now we are ready to add this field to one of the RGCMS pages. That is quite simple to do... Firstly, go to the Pages section of the RGCMS, which will show you the list of the pages you have already created (if any...):

To add the form to one of your pages, just click on the View Extras for this Page button:


Now just give the page extra a name, and select the form you'd like to use on the page, then click the Save Form Page Extra button, and you're good to go. The form has now been added to the page. Note: you can still make as many changes to the actual form as you want. A good idea would be to create a thank you page and make sure that it is not in the menu, and link the form to that page - that means that the website will automatically redirect to that page when the form has been submitted!
That's it! This was just a short and sweet article on how to use the RGCMS Form Builder. Best would be to play around and create all the forms you want!
The RGCMS Lite also has the form builder built in, but with a few limitations:
1. You cannot have more than 3 forms at any one time.
2. You can only create 4 different field types, not 8 like the standards RGCMS (Text box, Drop Down Box, Text Area and Checkbox)
Other than that, they work exactly the same!
Enjoy!
Subscribe to:
Posts (Atom)