This is just a quick explanation of how photo galleries work on your RGCMS...
The default version of the gallery are basically three levels deep.
The top level is Galleries - You can create several galleries for your cms - this can be something like Weddings, Parties, Functions, etc. (if you're a photographer for example) - or whatever you want. More often than not, one gallery is enough, but, as you can see there are extra room for more.
The second level is Albums - Each Gallery can basically any number of Albums in it. So, for example, your Weddings gallery could have a John and Sue album, a Peter and Jane album, etc.
Then, the third level is Photos - Each album can basically have any number of photos in it.
That's the short and sweet of how the Galleries work!
Friday, February 27, 2009
Wednesday, February 18, 2009
Adding an image
Adding an image to your page is more or less the same as adding links, with a few minor details different:
First, click where you want to add the image, then click on the Insert/Edit Image button:

What you see on screen may be slightly different, but the idea remains the same. Anyway, this will open up the Image Properties Dialog:

Once again, what you see may be slightly different. Now, the easiest way to add a new image is by click on the Upload tab at the top, then click Browse to browse for the picture you want to upload, and click Send to Server:

Depending on the size of your image, it can take a while before the Image uploaded successfully screen shows:

This will bring you back to this screen, but now you'll see some of the text boxes have been filled in, and you'll see an example of how your picture will look inside your text:

Now, there's all kinds of properties you can set. Here is a summary of what they do:
Alternative Text: This is a short, optional, description of the picture. You usually see this when you hover your mouse pointer over the image.
Width and Height: This is the size in pixels that the image will be displayed on screen when someone views the page. As you can see, these values are automatically filled in to the actual sizes of the image you uploaded. If you want, you can change this, but its always a good idea to have the image you are uploading be the actual size you want it to display on the site. Especially true if the image is HUGE and you make the height and width properties smaller - the image will still take quite a long time to load.
Border: if you want a border around your image.
HSpace and VSpace: This is white space around your image so that any text is not touching the image. HSpace is the space to the left and right of the image, and VSpace is the space to the top and bottom of the image. Play around with the values and see what effect it will have. (usually a value of 10 or more is a good idea)
Align: Use this if you want the picture to be "inside" your text. Also, experiment to get the best setting you want.
After you have edited the properties of the image, click the Ok button, and voila! Your image is now in your page. Just remember to save the page after making any changes!
Tuesday, February 3, 2009
Linking to another website
If you want to make a link to another website with the What You See Is What You Get (WYSIWYG) editor, that is actually very easy and simple to do.
First, select the text or image you want the visitor to click on to follow the link:
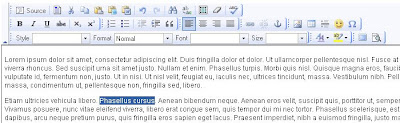
Your screen might look a bit different than the above image, but the basics remain the same...
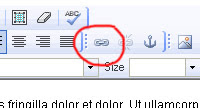
Anyway, now click on the Insert/Edit Link button, its icon is a picture of a chain link:
This will open up the Link Dialog box (graying out the background):
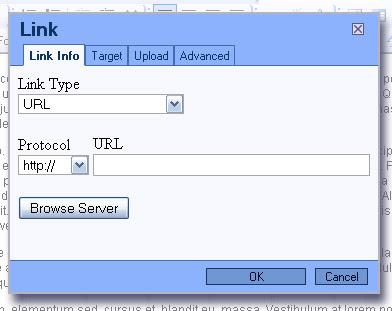
If you are linking to another website, simply enter the address in the URL box (like www.rgtwebhosting.com) and click OK at the bottom. This will turn your highlighted text or image into a link that can be clicked by your visitors.
First, select the text or image you want the visitor to click on to follow the link:

Your screen might look a bit different than the above image, but the basics remain the same...
Anyway, now click on the Insert/Edit Link button, its icon is a picture of a chain link:

This will open up the Link Dialog box (graying out the background):

If you are linking to another website, simply enter the address in the URL box (like www.rgtwebhosting.com) and click OK at the bottom. This will turn your highlighted text or image into a link that can be clicked by your visitors.
Monday, February 2, 2009
Working with Pages in the RGCMS
The whole idea of a website is based on web pages. Each website out there consists of at least one web page, but there can be up to several hundreds of pages on any website.
Now, web pages are categorized into two versions: Dynamic and Static. Dynamic pages are pages that usually pull their content from a database, and then, with the help of some programming in a language like PHP, is displayed on the screen. An example of a Dynamic website like this would be Kalahari.net or Amazon.com - they are both huge online shops, and all of their content comes out of a database.
Static pages are pages that do not often change, and if you do want to change Static pages, you'll have to edit the actual HTML file, and then upload it via FTP to your website server.
With the RGCMS, we have combined the two. The pages for the website appear to be static to the general public visiting your site, but their content is actually stored in a database, and the owner of the website has the necessary tools to be able to make changes to any of the loaded pages.
In the Admin Panel of the RGCMS, you will find a Menu Bar at the top with several Menu Items. One of them is Pages. Hovering over Pages will automatically open up a drop down menu, giving you the option to View Pages, Add a new Page and Rearrange pages.
Viewing the Pages
If you click View Pages, you will see a screen showing all of your websites' pages, if any. If you do NOT have any pages so far, you will see the relevant message, with the option to add a new page.
Adding a New Page
Clicking on the Add a New Page option in the menu under Pages, will directly take you to the Add a New Page screen. Depending on your specific website, you will see several "fields" that can be filled in, like Title, Keywords, Description etc.
The title of the page is what is going to be displayed in your websites' menu (navigation). It also determines what the "static" page's "filename" will be. For example, if you create a page with the title "Contact Us", then the page's "filename" will be ContactUs.html. Take note, with an FTP program, you will NOT see an actual file named "ContactUs.html" on the server - that is because it is a CMS page, and is part of the database.
Rearrange Pages
This will allow you to change the order of the pages that are stored. Say for example you just added a new page, then it will automatically go to the bottom of the pages list, but, with the Rearrange Pages function, you can move it to where you want it to be.
The RGCMS
After searching the internet quite extensively for a easy to use, simple content management system (CMS), we ended up with many a headache and late nights using the ones we actually tried. They were all just too powerful, and not at all user friendly. So, we decided to create our own...
Thus, the RGCMS were born. The whole aim of this CMS is to keep it as easy to use, and as simple for our clients as possible. They don't need to be able to change their stylesheets, or html coding, or anything like that. All they want to do is have the ability to manage the content of their website. That is, add new pages, edit existing pages and delete outdated pages. That is all!
I'm writing this blog to give some guidance in using the RGCMS. How simple and easy it is, so that our clients can easily maintain their own website, saving lots of money in the long run.
Subscribe to:
Posts (Atom)